Like many thirty-something Brits (and possible non-Brits, for all I know) my earliest introduction to the world of graphics programming was via a language called Logo running on the BBC Microcomputer.
This machine and its educational software were commonplace in UK schools in the 1980s, and I have clear memories of staying late at primary school (which I suppose means I was somewhere between 8 and 10) to fool around with BBC BASIC. With a friend I used to try to write text-based adventures ("you are in a cave, there are exits North, South, East and West" - you know the kind of thing) which we padded with loads and loads of comments to stop them from loading embarrassingly quickly from tape. Oh, the memories. 🙂
Anyway, I digress. Logo provided a really great introduction to vector graphics: even as we were being taught trigonometry we were exposed to an environment that allowed us to translate these concepts into graphics on a computer screen. Too cool.
Thinking back about all this, I decided to implement a simple turtle graphics engine inside AutoCAD, to allow eventual integration of a Logo-like language into it. The idea was this: to implement an engine exposing a series of methods (Move(), Turn(), PenUp(), PenDown(), SetPenColor() and SetPenWidth(), to start with) that could be used to implement a subset of the Logo language. I decided to write the engine in C#, whose object-orientation makes it well-suited to this type of task, and then look into using F# for implementing the language to drive it in a future post.
F# is very good for implementing new or existing programming languages: the whole area of Domain Specific Languages (DSLs) is a major selling point for functional languages, generally. They're very well-suited to the tasks that make up the interpretation/compilation process: lexical analysis, syntactic analysis, etc., as much of the hard work is around tokenizing strings, processing lists and mapping behaviours (and these activities are most functional programming languages' "bread and butter").
Only after deciding this approach did I stumble across an existing Logo implementation in F#, so it appears that integrating the Logo language may prove simpler than I expected.
A little more on the implementation of the turtle graphics engine: I decided to implement a 2D system, to start with, generating geometry as a series of Polyline objects. Every time the PenUp() function is called we tell the system to create a new object. We also do this for SetPenColor() in the cases where the colour is changed, as Polylines do not support per-segment colours (if we were to implement a custom object that did so, we could change the implementation to keep contiguous, multi-coloured segments in a single object). The current implementation reopens the previous object each time, and therefore creates a new transaction for every single Move() operation. This is clearly sub-optimal, but I quite like the old-school effect of watching the graphics get revealed segment by segment. 🙂 A more optimal technique would be to keep the object open while the pen is down and the engine is in use, and this is currently left as an exercise for the reader (or until I hit a use case where I can no longer be bothered to wait for the execution to complete :-).
It would be quite simple to take this engine into 3D, and I may well do so at some point in the future. There seem to be a number of successful 3D Logo implementations out there, and they really have great potential when generating organic models, as you can see from this page. Languages such as Logo can be applied very effectively to the task of generating fractal geometry by interpreting (and implementing) Lindenmayer (or L-) systems, for instance.
OK, enough background information... here's the C# code:
using Autodesk.AutoCAD.ApplicationServices;
using Autodesk.AutoCAD.DatabaseServices;
using Autodesk.AutoCAD.EditorInput;
using Autodesk.AutoCAD.Runtime;
using Autodesk.AutoCAD.Geometry;
using Autodesk.AutoCAD.Colors;
using System;
namespace TurtleGraphics
{
// This class encapsulates pen
// information and will be
// used by our TurtleEngine
class Pen
{
// Private members
private Color m_color;
private double m_width;
private bool m_down;
// Public properties
public Color Color
{
get { return m_color; }
set { m_color = value; }
}
public double Width
{
get { return m_width; }
set { m_width = value; }
}
public bool Down
{
get { return m_down; }
set { m_down = value; }
}
// Constructor
public Pen()
{
m_color =
Color.FromColorIndex(ColorMethod.ByAci, 0);
m_width = 0.0;
m_down = false;
}
}
// The main Turtle Graphics engine
class TurtleEngine
{
// Private members
private ObjectId m_currentObject;
private Pen m_pen;
private Point3d m_position;
private Vector3d m_direction;
// Public properties
public Point3d Position
{
get { return m_position; }
set { m_position = value; }
}
public Vector3d Direction
{
get { return m_direction; }
set { m_direction = value; }
}
// Constructor
public TurtleEngine()
{
m_pen = new Pen();
m_currentObject = ObjectId.Null;
m_position = Point3d.Origin;
m_direction = new Vector3d(1.0, 0.0, 0.0);
}
// Public methods
public void Turn(double angle)
{
// Rotate our direction by the
// specified angle
Matrix3d mat =
Matrix3d.Rotation(
angle,
Vector3d.ZAxis,
Position
);
Direction =
Direction.TransformBy(mat);
}
public void Move(double distance)
{
// Move the cursor by a specified
// distance in the direction in
// which we're pointing
Point3d oldPos = Position;
Position += Direction * distance;
// If the pen is down, we draw something
if (m_pen.Down)
GenerateSegment(oldPos, Position);
}
public void PenDown()
{
m_pen.Down = true;
}
public void PenUp()
{
m_pen.Down = false;
// We'll start a new entity with the next
// use of the pen
m_currentObject =
ObjectId.Null;
}
public void SetPenWidth(double width)
{
m_pen.Width = width;
}
public void SetPenColor(int idx)
{
// Right now we just use an ACI,
// to make the code simpler
Color col =
Color.FromColorIndex(
ColorMethod.ByAci,
(short)idx
);
// If we have to change the color,
// we'll start a new entity
// (if the entity type we're creating
// supports per-segment colors, we
// don't need to do this)
if (col != m_pen.Color)
{
m_currentObject =
ObjectId.Null;
m_pen.Color = col;
}
}
// Internal helper to generate geometry
// (this could be optimised to keep the
// object we're generating open, rather
// than having to reopen it each time)
private void GenerateSegment(
Point3d oldPos, Point3d newPos)
{
Document doc =
Application.DocumentManager.MdiActiveDocument;
Database db = doc.Database;
Editor ed = doc.Editor;
Autodesk.AutoCAD.ApplicationServices.
TransactionManager tm =
doc.TransactionManager;
Transaction tr =
tm.StartTransaction();
using (tr)
{
Polyline pl;
Plane plane;
// Create the current object, if there is none
if (m_currentObject == ObjectId.Null)
{
BlockTable bt =
(BlockTable)tr.GetObject(
db.BlockTableId,
OpenMode.ForRead
);
BlockTableRecord ms =
(BlockTableRecord)tr.GetObject(
bt[BlockTableRecord.ModelSpace],
OpenMode.ForWrite
);
// Create the polyline
pl = new Polyline();
pl.Color = m_pen.Color;
// Define its plane
plane = new Plane(
pl.Ecs.CoordinateSystem3d.Origin,
pl.Ecs.CoordinateSystem3d.Zaxis
);
// Add the first vertex
pl.AddVertexAt(
0, oldPos.Convert2d(plane),
0.0, m_pen.Width, m_pen.Width
);
// Add the polyline to the database
m_currentObject =
ms.AppendEntity(pl);
tr.AddNewlyCreatedDBObject(pl, true);
}
else
{
// Get the current object, if there is one
pl =
(Polyline)tr.GetObject(
m_currentObject,
OpenMode.ForWrite
);
// Calculate its plane
plane = new Plane(
pl.Ecs.CoordinateSystem3d.Origin,
pl.Ecs.CoordinateSystem3d.Zaxis
);
}
// Now we have our current object open,
// add the new vertex
pl.AddVertexAt(
pl.NumberOfVertices,
newPos.Convert2d(plane),
0.0, m_pen.Width, m_pen.Width
);
// Display the graphics, to avoid long,
// black-box operations
tm.QueueForGraphicsFlush();
tm.FlushGraphics();
ed.UpdateScreen();
tr.Commit();
}
}
}
public class Commands
{
// A command to create some simple geometry
[CommandMethod("DTG")]
static public void DrawTurtleGraphics()
{
TurtleEngine te = new TurtleEngine();
// Draw a red circle
te.SetPenColor(1);
te.SetPenWidth(7);
te.PenDown();
for (int i = 0; i < 360; i++)
{
te.Move(2);
te.Turn(Math.PI / 180);
}
// Move to the next space
te.PenUp();
te.Move(200);
// Draw a green square
te.SetPenColor(3);
te.SetPenWidth(5);
te.PenDown();
for (int i = 0; i < 4; i++)
{
te.Move(230);
te.Turn(Math.PI / 2);
}
// Move to the next space
te.PenUp();
te.Move(300);
// Draw a blue triangle
te.SetPenColor(5);
te.SetPenWidth(3);
te.PenDown();
for (int i = 0; i < 3; i++)
{
te.Move(266);
te.Turn(2 * Math.PI / 3);
}
// Move to the next space
te.PenUp();
te.Move(400);
te.Turn(Math.PI / 2);
te.Move(115);
te.Turn(Math.PI / -2);
// Draw a multi-colored, spirograph-like shape
te.SetPenWidth(1);
te.PenDown();
for (int i = 0; i < 36; i++)
{
te.Turn(Math.PI / 18);
te.SetPenColor(i);
for (int j = 0; j < 360; j++)
{
te.Move(1);
te.Turn(Math.PI / 180);
}
}
}
}
}
Here are the results of running the DTG command, which simply calls into the TurtleEngine to test out its capabilities, creating a series of shapes of different pen colours and widths:
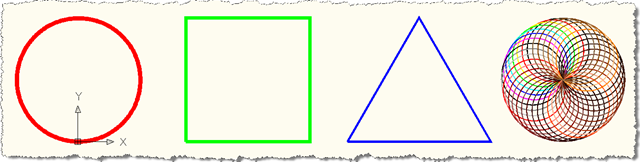
The first three objects are single objects, but are multi-segment polylines (don't expect the engine to generate circles, for instance: most turtle graphics code to generate circles actually create objects with 360 segments). The fourth object is a series of 36 circles: as mentioned earlier, Polyline objects do not support per-segment colours, but if this was all a uniform colour (by commenting out the call to te.SetPenColor(i)), it would all be a single Polyline with 36 * 360 segments.
Leave a Reply to David Osborne Cancel reply