This topic started in this recent post, where I introduced a simple turtle graphics engine for AutoCAD implemented in C#. My eventual aim is still to implement a subset of the Logo programming language in F#, calling through to this C# engine, but for now I've been side-tracked: I'm simply having too much fun with the engine itself and exploring the possibilities of turtle graphics inside AutoCAD - especially around the use of recursive algorithms to generate fractals.
This post and the next (and maybe more, depending on how much fun I continue to have) will be devoted to recursive algorithms for fractal generation with a cursor-based, turtle graphics system: in this post we'll start with performance-related improvements to the engine alluded to in the last post, and move on to code to generate precise fractals. The next post will take this further by looking at adding randomness to fractals, allowing us to create more organic forms.
So let's start with the engine enhancements: I mentioned last time that the previous implementation was sub-optimal, as it used a new transaction for each segment created. I did some benchmarking, to see what improvement gains were to be had by changing the implementation, and - interestingly - there was very little change when I modified the engine to maintain a single transaction when testing with the DTG command in the previous post. It turns out that the bottleneck for that particular scenario was the graphics update: refreshing the graphics after each segment drawn is extremely time-consuming, so the overhead of using separate transactions per segment didn't really impact performance. As we move on to much larger models - as we will in this post - it makes sense to perform two optimizations to the engine:
- Turn off display of graphics during update
- We will not flush any graphics and simply let AutoCAD take care of updating the display when we're done
- A single transaction per execution
- We will maintain references to a Transaction and a Polyline within our engine, instead of an ObjectId
Implementing this is very simple, as you can see below, and the client code only really needs to make one change: it needs to start its own transaction and pass that into the constructor of the TurtleEngine. This will be used, as needed, and must, of course, be committed and disposed of by the client at the end (we'll use the using statement to take care of the disposal).
Once the graphics flushing has been disabled (again, with a trivial change: I've added a Boolean variable - with a default value of false - to check before updating the graphics), we really start to see the relevance of maintaining a separate transaction, as our previous performance bottleneck has been removed. More on this later.
Onto the fractal algorithm we're implementing today, to put the engine through its paces: some of you may remember this previous pair of posts, where we looked at an implementation for generating Koch curves inside AutoCAD. In this case we're going to generate something called the Koch snowflake, which is basically a triangle with each segment divided a series of times:
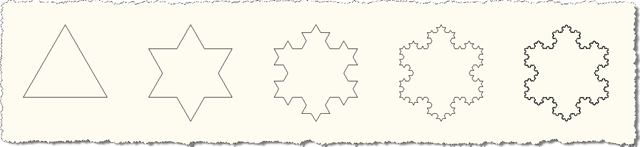
The formula for calculating the number of sides is: 3 * 4^l, where l is the recursion level (at least from our perspective, a triangle is level 0, while the right-most shape above is level 5). I have kept two implementations of the engine in my project, for comparison: when using the old implementation, a level 7 Koch snowflake - which for us means a Polyline of 49,152 segments - takes 5 minutes to generate. With the new approach of maintaining a single transaction, this reduces to under 2 seconds. Which is clearly a significant change. [Note: neither of these implementations update graphics until the end - if we were to update the screen for each of the ~50K segments, we'd be waiting for hours, I suspect.]
A level 8 snowflake took just 7 seconds for my system to generate with the new version of the engine. I limited the level selection to 8, not because it would take too long to generate, but because unless you disable rollover highlighting AutoCAD is likely to grind to a halt for a number of seconds when you hover over an object of this complexity: a level 8 snowflake does have 196,608 segments, after all.
Here's the C# code with the modified engine and the algorithm for creating Koch snowflakes:
using Autodesk.AutoCAD.ApplicationServices;
using Autodesk.AutoCAD.DatabaseServices;
using Autodesk.AutoCAD.EditorInput;
using Autodesk.AutoCAD.Runtime;
using Autodesk.AutoCAD.Geometry;
using Autodesk.AutoCAD.Colors;
using System;
namespace TurtleGraphics
{
// This class encapsulates pen
// information and will be
// used by our TurtleEngine
class Pen
{
// Private members
private Color m_color;
private double m_width;
private bool m_down;
// Public properties
public Color Color
{
get { return m_color; }
set { m_color = value; }
}
public double Width
{
get { return m_width; }
set { m_width = value; }
}
public bool Down
{
get { return m_down; }
set { m_down = value; }
}
// Constructor
public Pen()
{
m_color =
Color.FromColorIndex(ColorMethod.ByAci, 0);
m_width = 0.0;
m_down = false;
}
}
// The main Turtle Graphics engine
class TurtleEngine
{
// Private members
private Transaction m_trans;
private Polyline m_poly;
private Pen m_pen;
private Point3d m_position;
private Vector3d m_direction;
private bool m_updateGraphics;
// Public properties
public Point3d Position
{
get { return m_position; }
set { m_position = value; }
}
public Vector3d Direction
{
get { return m_direction; }
set { m_direction = value; }
}
// Constructor
public TurtleEngine(Transaction tr)
{
m_pen = new Pen();
m_trans = tr;
m_poly = null;
m_position = Point3d.Origin;
m_direction = new Vector3d(1.0, 0.0, 0.0);
m_updateGraphics = false;
}
// Public methods
public void Turn(double angle)
{
// Rotate our direction by the
// specified angle
Matrix3d mat =
Matrix3d.Rotation(
angle,
Vector3d.ZAxis,
Position
);
Direction =
Direction.TransformBy(mat);
}
public void Move(double distance)
{
// Move the cursor by a specified
// distance in the direction in
// which we're pointing
Point3d oldPos = Position;
Position += Direction * distance;
// If the pen is down, we draw something
if (m_pen.Down)
GenerateSegment(oldPos, Position);
}
public void PenDown()
{
m_pen.Down = true;
}
public void PenUp()
{
m_pen.Down = false;
// We'll start a new entity with the
// next use of the pen
m_poly = null;
}
public void SetPenWidth(double width)
{
m_pen.Width = width;
}
public void SetPenColor(int idx)
{
// Right now we just use an ACI,
// to make the code simpler
Color col =
Color.FromColorIndex(
ColorMethod.ByAci,
(short)idx
);
// If we have to change the color,
// we'll start a new entity
// (if the entity type we're creating
// supports per-segment colors, we
// don't need to do this)
if (col != m_pen.Color)
{
m_poly = null;
m_pen.Color = col;
}
}
// Internal helper to generate geometry
// (this could be optimised to keep the
// object we're generating open, rather
// than having to reopen it each time)
private void GenerateSegment(
Point3d oldPos, Point3d newPos)
{
Document doc =
Application.DocumentManager.MdiActiveDocument;
Database db = doc.Database;
Editor ed = doc.Editor;
Autodesk.AutoCAD.ApplicationServices.
TransactionManager tm =
doc.TransactionManager;
Plane plane;
// Create the current object, if there is none
if (m_poly == null)
{
BlockTable bt =
(BlockTable)m_trans.GetObject(
db.BlockTableId,
OpenMode.ForRead
);
BlockTableRecord ms =
(BlockTableRecord)m_trans.GetObject(
bt[BlockTableRecord.ModelSpace],
OpenMode.ForWrite
);
// Create the polyline
m_poly = new Polyline();
m_poly.Color = m_pen.Color;
// Define its plane
plane = new Plane(
m_poly.Ecs.CoordinateSystem3d.Origin,
m_poly.Ecs.CoordinateSystem3d.Zaxis
);
// Add the first vertex
m_poly.AddVertexAt(
0, oldPos.Convert2d(plane),
0.0, m_pen.Width, m_pen.Width
);
// Add the polyline to the database
ms.AppendEntity(m_poly);
m_trans.AddNewlyCreatedDBObject(m_poly, true);
}
else
{
// Calculate its plane
plane = new Plane(
m_poly.Ecs.CoordinateSystem3d.Origin,
m_poly.Ecs.CoordinateSystem3d.Zaxis
);
}
// Now we have our current object open,
// add the new vertex
m_poly.AddVertexAt(
m_poly.NumberOfVertices,
newPos.Convert2d(plane),
0.0, m_pen.Width, m_pen.Width
);
// Display the graphics, to avoid long,
// black-box operations
if (m_updateGraphics)
{
tm.QueueForGraphicsFlush();
tm.FlushGraphics();
ed.UpdateScreen();
}
}
}
public class Commands
{
static void KochIsland(
TurtleEngine te,
double size,
int level
)
{
for (int i = 0; i < 3; i++)
{
// Draw a side
KSide(te, size, level);
// Turn 120 degrees to the left
te.Turn(2 * Math.PI / 3);
}
}
static void KSide(
TurtleEngine te,
double size,
int level
)
{
// When at level 0, draw the side and exit
if (level == 0)
te.Move(size);
else
{
// Else recurse for each segment of the side
KSide(te, size / 3, level - 1);
te.Turn(Math.PI / -3);
KSide(te, size / 3, level - 1);
te.Turn(2 * Math.PI / 3);
KSide(te, size / 3, level - 1);
te.Turn(Math.PI / -3);
KSide(te, size / 3, level - 1);
}
}
[CommandMethod("KSF")]
static public void KochSnowFlake()
{
Document doc =
Application.DocumentManager.MdiActiveDocument;
Editor ed = doc.Editor;
// Ask for the recursion level
int level = 6;
PromptIntegerOptions pio =
new PromptIntegerOptions(
"\nEnter recursion level <6>: "
);
pio.AllowNone = true;
pio.LowerLimit = 0;
pio.UpperLimit = 8;
PromptIntegerResult pir =
ed.GetInteger(pio);
if (pir.Status != PromptStatus.OK &&
pir.Status != PromptStatus.None)
return;
if (pir.Status == PromptStatus.OK)
level = pir.Value;
Transaction tr =
doc.TransactionManager.StartTransaction();
using (tr)
{
TurtleEngine te = new TurtleEngine(tr);
// Draw a Koch snowflake
te.SetPenColor(0);
te.SetPenWidth(0);
te.PenDown();
// 100 is an arbitrary value:
// you could also prompt the user for this
KochIsland(te, 100, level);
tr.Commit();
}
}
}
}
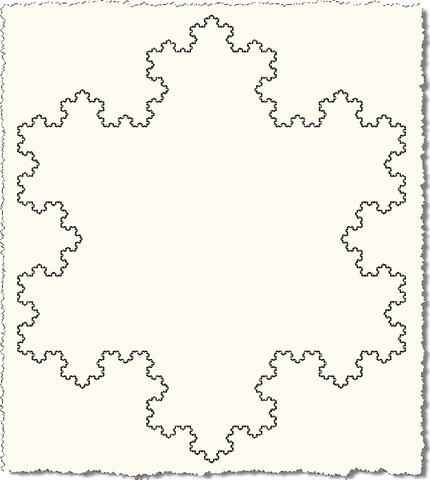
Here are the results of the KSF command, when used to generate a level 6 snowflake. Although frankly you wouldn't see a difference between a level 5 and a level 10 snowflake at this resolution. 🙂
Next time we'll look at some recursive code to generate less precise, more natural forms.
Leave a Reply to Kean Walmsley Cancel reply