Reality capture
-
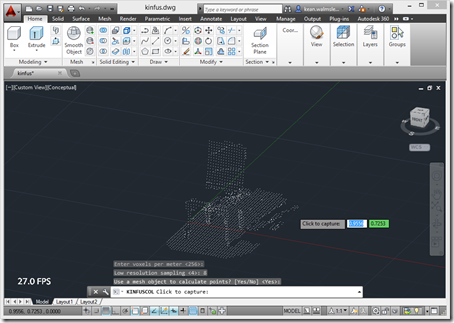
Something you realise quite early on when working with the Kinect Fusion component in the Microsoft Kinect SDK is that it's really meant to integrate into a 2D UI: it takes care of rendering the volume that's being mapped, and you simply have to integrate the generated bitmap somewhere into your app's UI. The primary benefit of this approach is its low latency: it all happens very quickly and the only data you need to move from the runtime into your app is the bitmap itself. With 3D systems such as AutoCAD, though, you really want to take the 3D…
-
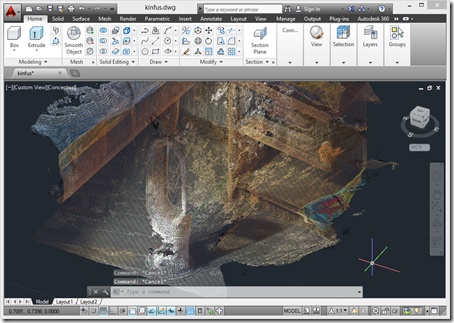
A few weeks ago the Kinect SDK was updated to version 1.8. I'd been eagerly awaiting this update for one reason, in particular: aside from receiving some updates to provide more robust tracking – something that was very much needed – Kinect Fusion has now been updated to include realistic colours in the output. There are some additional SDK enhancements, such as a background removal APIs (good for greenscreening) and HTML support (handy for interactive kiosks), but the ones that interest me most relate to Kinect Fusion. There are a few new Kinect Fusion samples that I need to take…
-
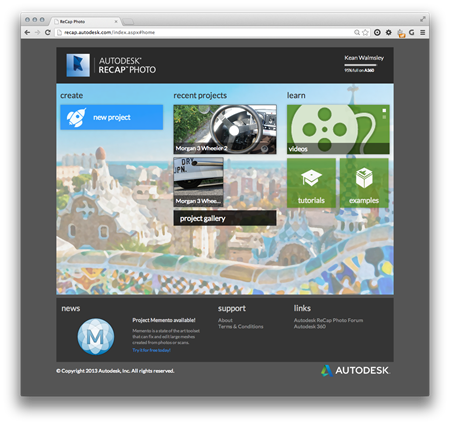
After taking a look at Project Memento, last week, using it to manipulate a mesh I'd previously created with ReCap Photo, I decided to try out the latest update to the latter of these two tools. The first thing to notice with this new, improved version of ReCap Photo is that it has its own portal showing your active projects: The tool itself works in the same way: you simply select multiple photos in Autodesk 360 and select "Create 3D model" from the action menu. In fact, all I had to do to try this new version was to resubmit…
-

This morning I went back to look at Project Memento, with a view to using it to trim down a model I captured using ReCap Photo. I started with the model of the Morgan 3 Wheeler shown in this previous post. The first thing you'll notice when launching Project Memento is the modern, chrome-free user interface making copious use of marking menus. Navigation is fairly simple using a 3-button mouse. It was straightforward to select sections of the mesh and delete them: I repeated this – along with various zoom/pan/rotate operations to make different sections of the model visible for…
-

Once again I'm a bit late announcing this one: I had friends visiting from the UK, last week, and so took the week off (although I ended finding a fair amount of time to study linear algebra, which was surprisingly fun). I'd queued up the week's blog posts in advance to reduce the chance of people noticing my absence. 😉 I first heard about Project Memento when I visited Singapore a few months ago (I predicted in that blog post that I'd be writing about this project the day it was live on Labs, but unfortunately that clearly didn't end…
-
In the last post we took a look at how we could make use of the .obj output from a ReCap Photo model of a car to perform virtual wind tunnel analysis using the standalone version of Project Falcon, a flow simulation tool currently on Autodesk Labs. This post extends (or forks) that workflow to achieve my goal of performing virtual wind tunnel analysis on a Morgan 3 Wheeler in the AutoCAD-based version of Project Falcon. After stitching a 3D scene from photos using ReCap Photo – and exporting it to .obj – we need to bring the model into…
-

Here's the thing. While it's nice to be able to capture interesting-looking models with Autodesk ReCap Photo, what we really want is an output format that's useable in other products. In my case, what I personally wanted to do was first hinted at in this post: display a model of the Morgan 3 Wheeler in a virtual wind tunnel using Project Falcon (a project on Autodesk Labs which is – at the time of writing – scheduled to run until August 30, 2013). So let's take a look at the output formats of the ReCap Photo service and see how…
-
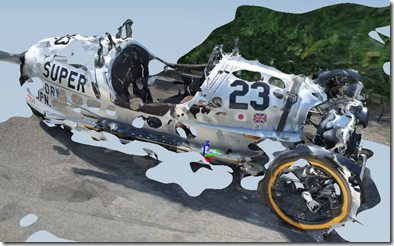
My apologies if you've reached this post while looking for a detailed comparison or analysis of these two products: this is just me sharing some anecdotal experience I've had of uploading – and working with – the same dataset in the two systems. The subject I chose for this comparison is somewhat strange, as it's notoriously hard to use photogrammetry to reconstruct 3D models from cars: they're generally too shiny. But while this particular car has plenty of shiny, its main body of paintwork is a gorgeous matte silver, so I thought I'd take a chance with it. I've talked…
-
A little over a year ago I first saw the HTML version of 123D Catch. My first thought was "that's cool!" and my second was "I wonder whether you can embed the WebGL control to host a 123D Catch scene in an external web-page?". Basically allowing bloggers – or people posting to forums, perhaps – to embed 3D content captured using 123D Catch in their pages, much as you would do with a YouTube video. At the recent technical conference in Boston, I asked someone about the feature. Sure enough it had been added some time ago (probably around the…
-
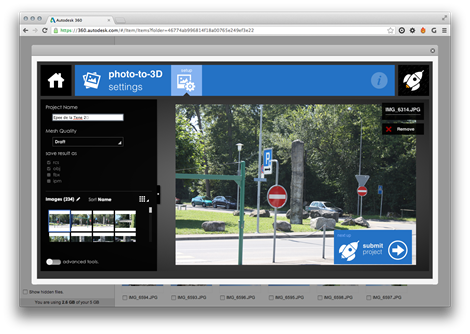
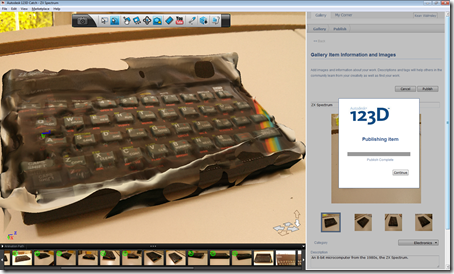
You're hopefully by now familiar with 123D Catch – a technology I've talked about before, a consumer-focused tool for reconstructing 3D models from photos – but Autodesk is also providing a professional-grade version of the system on Autodesk 360 called Autodesk ReCap Photo. To get access to the trial version of this tool, simply log in to Autodesk 360 and upload some photos of the scene you'd like to capture. You can then multi-select the photos, right-click and select "Create 3D model". You'll be presented with the "photo-to-3D settings" window that allows you to enter the name for the project…