Jigs
-
I'm sure some of you will be relieved to see I can still (more or less) manage to write code for AutoCAD… the last few days I've been feeling quite under-the-weather, so today's post is a little bit of "comfort code": sometimes while you're brain is struggling to handle the unfamiliar, it's very happy to tackle the familiar. At least that was the plan, and the reason I decided to tackle this recent question from Thomas Heitz: I would like to write an code to change automatically the structure label style while dragging the label. So I created two labels…
-
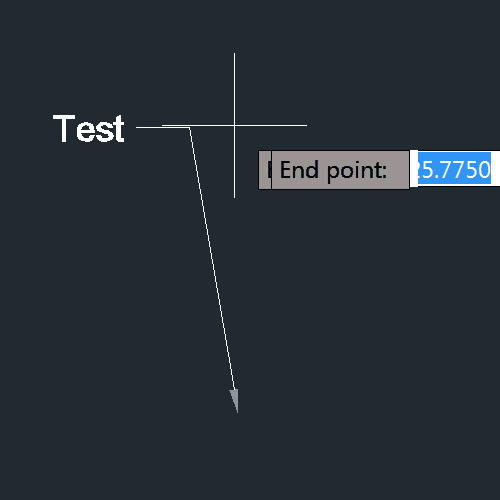
Our old friend Roland Feletic emailed me last week. He'd been having some trouble with this previous post when jigging blocks with multiline attributes. Roland had also identified some code in this post on another blog which worked properly for him. I spent some time looking into what was wrong with the original post. It certainly didn't deal with the appropriate placement of multiline text, and didn't take proper care of annotation scaling and UCS. Time for a do-over. 🙂 The following C# code is a combination of the code from the previous post and the approach spiderinnet1 took in…
-

Many thanks to Holger Rasch who worked out how to fix the code in this previous post. It really doesn't matter that 3 years have passed, Holger – I have no doubt people will greatly appreciate the fact the code can now run without causing the annoying display issues it produced previously. Holger made a few adjustments to the implementation to make sure the persistent hatch loop gets added and removed in the right places. Here's the updated C# code: using Autodesk.AutoCAD.ApplicationServices; using Autodesk.AutoCAD.DatabaseServices; using Autodesk.AutoCAD.EditorInput; using Autodesk.AutoCAD.Geometry; using Autodesk.AutoCAD.Runtime; using Autodesk.AutoCAD.Colors; using System; namespace HatchJig { class…
-
I wasn't expecting to write a third part in this series of posts, but then Samir Bittar went and asked a follow-up question that I felt obliged to look into. Thanks for the suggestion, Samir! 🙂 Samir basically wanted to provide the user with more feedback as they're selecting the nested entity – so that the sub-entity gets highlighted, rather than the full block reference. This turned out to be quite a tricky scenario to address. The overall approach I used was to use a PointMonitor to perform a non-interactive, nested selection of the geometry beneath the cursor and then…
-
I was planning to post about Autodesk University 2013 today, but things have just been too hectic. I have a 3-hour layover in Heathrow on the journey home – which starts this evening – so I'll try to use that to post a summary of this year's AU as experienced by yours truly. In the last post we saw some code to move an entity – any entity, with text as the primary requirement – in a block. Here's a version of the C# code that shows the entity as it's being jigged across the screen to its new position.…
-
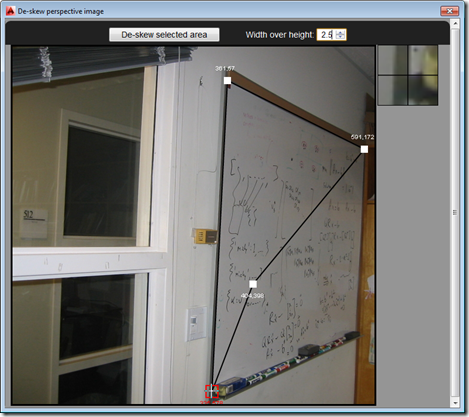
So after several posts leading up to the big reveal, as it were, in today's post we're going to see the full "De-skew Raster" application in action – and give you the complete source to fool around with. The main addition over where we were in the last post is the HTML5 and JavaScript UI implementation, as well as the new C# command – called DESKEW – that loads and displays it: Our JavaScript code uses the new JavaScript API in AutoCAD 2014 to execute the other command (DESKEW_IMAGE, which we saw implemented last time) that drives the core Python…
-
I've learned a few things since the last post, where we complemented AutoCAD's new JavaScript API with some additional .NET functionality to work around an issue that existed in the code we'd developed in the previous two posts. Firstly, I found out there's a better way for your jig to display transient graphics than via "manual" calls to addTransient(), updateTransient() and eraseTransient(). Acad.Jig exposes an update() function you can call, passing in the xml fragment representing your geometry. The jig will manage the display of the transient and clear it at the end. (Thanks to Sherry Tan for pointing me…
-
After having some fun writing our first jig inside AutoCAD, last week, and calling it either from an HTML page or an AutoCAD command defined in a .js file, in today's post we're going to see how we can use AutoCAD's .NET API to extend its new JavaScript layer. We're going to take a concrete problem we had in last week's implementation: it turns out that when you draw a transient circle beneath the cursor using JavaScript – as we do during our jig – it absorbs mouse clicks. This is something we've logged as an issue, but it seems…
-
Just to complement yesterday's post showing how to define a simple jig using JavaScript, here's the same code from a separate .js file: var doc = Acad.Application.activedocument; var center = new Acad.Point3d(0, 0, 0); var radius = 0; var trId; function pointToString(pt) { var ret = pt.x.toString() + "," + pt.y.toString() + "," + pt.z.toString(); return ret; } function createCircle(cen, rad, first) { // Build an XML string containing data to create // an AcGiTransient that represents the circle var cursor = ''; var drawable =…
-
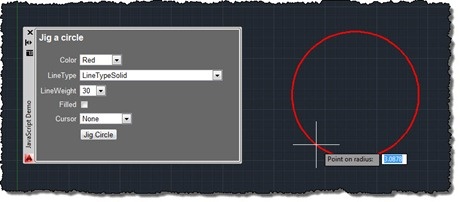
After talking about the architecture of our JavaScript API in this recent post – and mentioning the approach we expect developers to take when creating geometry in one of the comments – I thought it would be worth spending the time to write my first JavaScript jig in AutoCAD. For those of you who haven't come across jigs in either ObjectARX or AutoCAD .NET, jigs are the primary way applications request users to dynamically specify geometric parameters while providing them with graphical feedback. As users select points or specify distances, the object or objects they're creating are updated in real-time…